Mastering Remote Access To Raspberry Pi Via SSH: A Comprehensive Guide
Remote access to Raspberry Pi via SSH has become an essential skill for both beginners and advanced users in the world of IoT and embedded systems. Whether you're setting up a home server, managing a media center, or running a weather station, having the ability to control your Raspberry Pi remotely is invaluable. This guide will walk you through everything you need to know to securely connect to your Raspberry Pi from anywhere in the world.
SSH (Secure Shell) is a network protocol that allows users to securely access remote computers or devices over an unsecured network. It provides a reliable way to manage your Raspberry Pi without needing physical access. This article will delve into the step-by-step process of setting up SSH on your Raspberry Pi, ensuring security, troubleshooting common issues, and offering tips to enhance your experience.
By the end of this guide, you'll have a solid understanding of how remote access to Raspberry Pi via SSH works, the tools you need, and best practices to keep your setup secure. Let's dive in!
Read also:Sheeko Wasmo The Rising Star Of Modern Music Scene
Table of Contents
- Introduction to SSH and Raspberry Pi
- Setting Up SSH on Raspberry Pi
- Connecting to Raspberry Pi via SSH
- Enhancing SSH Security
- Tools and Software for SSH
- Troubleshooting Common Issues
- Real-World Use Cases
- Improving SSH Performance
- Automating SSH Connections
- Best Practices for SSH
- Conclusion and Next Steps
Introduction to SSH and Raspberry Pi
SSH, or Secure Shell, is a cryptographic network protocol that facilitates secure communication between devices over an insecure network. For Raspberry Pi users, SSH is a powerful tool that enables remote access, allowing you to control your device from anywhere in the world.
Setting up SSH on a Raspberry Pi is straightforward, thanks to the built-in support in Raspberry Pi OS. Once configured, you can manage your Pi remotely using a terminal or an SSH client, eliminating the need for a monitor, keyboard, or mouse. This flexibility makes SSH an indispensable tool for Raspberry Pi enthusiasts.
Why Choose SSH for Raspberry Pi?
- Secure connection through encryption
- Easy to set up and use
- Lightweight and resource-efficient
- Supports automation and scripting
Setting Up SSH on Raspberry Pi
Configuring SSH on your Raspberry Pi involves a few simple steps. Whether you're using Raspberry Pi OS or another Linux distribution, the process remains largely the same. Below is a detailed guide to help you get started.
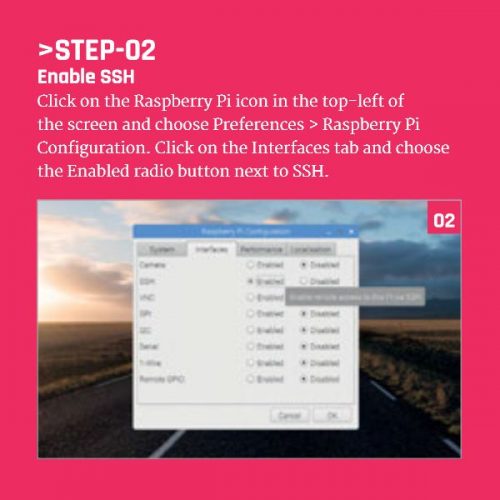
Step 1: Enable SSH on Raspberry Pi
By default, SSH is disabled on Raspberry Pi OS for security reasons. To enable it, follow these steps:
- Insert your Raspberry Pi's microSD card into your computer.
- Create an empty file named
sshin the boot partition of the SD card. - Insert the SD card back into your Raspberry Pi and power it on.
Step 2: Check SSH Status
Once your Raspberry Pi is powered on, you can verify if SSH is active by running the following command:
sudo systemctl status ssh
Read also:Is Maddy Smith Married Exploring The Life And Relationship Status Of A Rising Star
If the service is running, you'll see an output indicating that SSH is active.
Connecting to Raspberry Pi via SSH
With SSH enabled, the next step is to connect to your Raspberry Pi from another device. This can be done using a terminal on Linux or macOS, or an SSH client like PuTTY on Windows.
Step 1: Find Your Raspberry Pi's IP Address
Before connecting, you need to know your Raspberry Pi's IP address. You can find this by:
- Using the
ifconfigorip addrcommand on your Raspberry Pi. - Checking your router's connected devices list.
Step 2: Establishing the Connection
Using a terminal or SSH client, enter the following command:
ssh pi@
Replace pi user, which is usually raspberry by default.
Enhancing SSH Security
While SSH is secure by design, there are additional measures you can take to protect your Raspberry Pi from unauthorized access.
Change Default Credentials
One of the simplest ways to improve security is by changing the default username and password. Use the following commands:
sudo passwd pi
This will prompt you to set a new password for the pi user.
Disable Password Authentication
To further enhance security, disable password authentication and use SSH keys instead. Here's how:
- Generate an SSH key pair on your local machine using
ssh-keygen. - Copy the public key to your Raspberry Pi using
ssh-copy-id pi@. - Disable password authentication by editing the SSH configuration file:
sudo nano /etc/ssh/sshd_config. - Set
PasswordAuthenticationtonoand restart the SSH service:sudo systemctl restart ssh.
Tools and Software for SSH
Several tools and software can make your SSH experience smoother and more efficient. Below are some popular options:
1. PuTTY
PuTTY is a free and open-source SSH client for Windows that offers a user-friendly interface. It supports various protocols, including SSH, Telnet, and Rlogin.
2. Terminal (macOS/Linux)
For macOS and Linux users, the built-in terminal provides a powerful and flexible way to manage SSH connections. Simply use the ssh command to connect to your Raspberry Pi.
3. MobaXterm
MobaXterm is an advanced SSH client for Windows that includes features like X11 forwarding, file transfer, and session management.
Troubleshooting Common Issues
Even with careful setup, issues can arise when using SSH. Below are solutions to some common problems:
Problem: Unable to Connect
Ensure that:
- SSH is enabled on your Raspberry Pi.
- You're using the correct IP address.
- Firewall rules allow SSH traffic on port 22.
Problem: Connection Timeout
Check your network connection and ensure that your Raspberry Pi is reachable from the device you're using to connect.
Real-World Use Cases
Remote access to Raspberry Pi via SSH opens up a world of possibilities. Here are some practical applications:
1. Home Automation
Control smart home devices and manage automation scripts from anywhere using SSH.
2. Web Server Management
Use SSH to configure and maintain a web server running on your Raspberry Pi.
3. File Sharing
Transfer files securely between your Raspberry Pi and other devices using SCP (Secure Copy Protocol).
Improving SSH Performance
While SSH is inherently secure, there are ways to optimize its performance:
Use Compression
Enable compression in your SSH configuration to speed up data transfer:
Compression yes
Choose the Right Cipher
Select a cipher that balances security and performance. For example:
Ciphers aes128-ctr,aes192-ctr,aes256-ctr
Automating SSH Connections
Automating SSH connections can save time and reduce manual effort. Use scripts and tools like SSH tunnels and cron jobs to streamline your workflow.
Example: Automating File Backup
Create a script that uses SCP to back up files from your Raspberry Pi to a remote server:
scp -r /path/to/files user@remote_server:/backup
Best Practices for SSH
To ensure a secure and efficient SSH setup, follow these best practices:
- Regularly update your Raspberry Pi's operating system and SSH client.
- Use strong passwords and SSH keys for authentication.
- Monitor login attempts and block suspicious activity.
- Limit SSH access to trusted IP addresses if possible.
Conclusion and Next Steps
Remote access to Raspberry Pi via SSH is a powerful tool that empowers users to manage their devices with ease and flexibility. By following the steps outlined in this guide, you can set up a secure and efficient SSH connection, troubleshoot common issues, and explore real-world applications.
We encourage you to experiment with SSH and discover new ways to leverage its capabilities. Share your experiences in the comments below or explore other articles on our site to deepen your knowledge of Raspberry Pi and related technologies.
Call to Action: Did you find this guide helpful? Let us know by leaving a comment or sharing this article with your network!


