How To Use Monitor Raspberry Pi Behind Firewall On Windows 10
Managing a Raspberry Pi behind a firewall on Windows 10 can be a powerful way to monitor and control your home or office network. This guide will walk you through the steps required to set up and use your Raspberry Pi effectively while ensuring secure communication through a firewall.
As more people integrate Raspberry Pi into their networks, the need for secure configurations becomes increasingly important. Whether you're using Raspberry Pi for home automation, IoT projects, or as a server, ensuring it's properly configured behind a firewall on Windows 10 is essential to protect your data and devices.
This comprehensive guide will provide step-by-step instructions on how to use a Raspberry Pi behind a firewall on Windows 10. You'll learn about the necessary tools, software, and configurations needed to monitor and manage your Raspberry Pi securely. Let's dive in!
Read also:Dan Souza Wife The Untold Story Of Love Life And Success
Table of Contents
- Introduction to Raspberry Pi Monitoring
- Hardware Setup Requirements
- Software Setup for Raspberry Pi
- Configuring Windows Firewall
- Setting Up Remote Access
- Using Monitoring Tools
- Security Best Practices
- Troubleshooting Common Issues
- Optimizing Raspberry Pi Performance
- Conclusion and Next Steps
Introduction to Raspberry Pi Monitoring
Raspberry Pi has become one of the most popular single-board computers due to its versatility and affordability. Monitoring a Raspberry Pi behind a firewall on Windows 10 is crucial for maintaining secure communication and ensuring your device operates efficiently.
To use Raspberry Pi behind a firewall, you'll need to configure your Windows 10 firewall settings to allow specific traffic. This involves setting up rules that enable communication between your Windows PC and the Raspberry Pi while keeping unauthorized access at bay.
By the end of this guide, you'll have a clear understanding of how to configure and monitor your Raspberry Pi securely, ensuring optimal performance and protection.
Hardware Setup Requirements
Before diving into the software configuration, let's cover the hardware requirements for setting up Raspberry Pi behind a firewall on Windows 10:
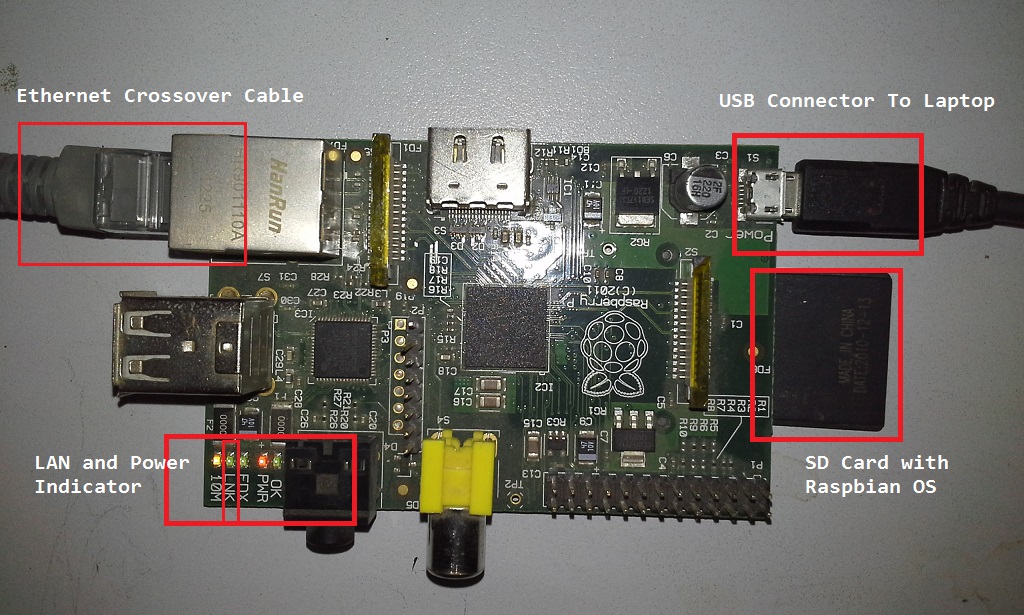
Basic Components
- Raspberry Pi (Model 3B+ or higher recommended)
- MicroSD card with pre-installed Raspberry Pi OS
- Power supply compatible with your Raspberry Pi model
- Ethernet cable or Wi-Fi adapter for network connectivity
- HDMI cable and monitor (optional, for initial setup)
Ensure all components are functioning properly before proceeding. A stable power supply and reliable network connection are essential for smooth operation.
Software Setup for Raspberry Pi
Once your hardware is ready, it's time to set up the software on your Raspberry Pi. Follow these steps to prepare your Raspberry Pi for monitoring:
Read also:Is Maddy Smith Married Exploring The Life And Relationship Status Of A Rising Star
Install Raspberry Pi OS
Download the latest version of Raspberry Pi OS from the official website and install it on your MicroSD card using a tool like Balena Etcher. Boot your Raspberry Pi and complete the initial setup process.
Update and Upgrade
Run the following commands to update your Raspberry Pi's software:
sudo apt update
sudo apt upgrade
This ensures your Raspberry Pi is running the latest version of its operating system, which includes important security patches.
Configuring Windows Firewall
Configuring the Windows 10 firewall is essential for allowing secure communication between your PC and Raspberry Pi. Follow these steps:
Add Inbound Rules
1. Open the Windows Defender Firewall with Advanced Security.
2. Click on "Inbound Rules" and select "New Rule."
3. Choose "Port" as the rule type and specify the ports used by your Raspberry Pi (e.g., SSH port 22).
4. Allow the connection and apply the rule to the appropriate network profile (Domain, Private, or Public).
Test the Connection
After setting up the firewall rules, test the connection by pinging your Raspberry Pi's IP address from your Windows PC. If successful, you've established a secure communication channel.
Setting Up Remote Access
Remote access is key to monitoring your Raspberry Pi from your Windows 10 PC. Here's how to set it up:
Enable SSH on Raspberry Pi
1. Open the Raspberry Pi Configuration tool.
2. Navigate to the "Interfaces" tab.
3. Enable SSH and restart your Raspberry Pi.
Use PuTTY for SSH
Download and install PuTTY on your Windows PC. Use it to connect to your Raspberry Pi via SSH by entering its IP address and selecting port 22. This allows you to manage your Raspberry Pi remotely.
Using Monitoring Tools
Several tools can help you monitor your Raspberry Pi's performance and health:
htop
Install htop for real-time monitoring of CPU, memory, and disk usage:
sudo apt install htop
Run htop to view detailed system metrics.
Netdata
Netdata provides advanced monitoring capabilities:
bash
Access Netdata's web interface by navigating to http://[Raspberry Pi IP]:19999 in your browser.
Security Best Practices
Securing your Raspberry Pi behind a firewall is critical for protecting your network:
- Change the default SSH port to a non-standard port.
- Disable password authentication and use SSH keys instead.
- Regularly update your Raspberry Pi's software and firmware.
- Limit access to specific IP addresses using firewall rules.
Implementing these practices will significantly enhance the security of your Raspberry Pi setup.
Troubleshooting Common Issues
Here are some common issues you may encounter and how to resolve them:
Unable to Connect via SSH
Ensure SSH is enabled on your Raspberry Pi and verify the firewall rules allow traffic on the specified port. Check your IP address configuration and try reconnecting.
Slow Performance
Monitor resource usage using tools like htop. If your Raspberry Pi is under heavy load, consider optimizing your applications or upgrading your hardware.
Optimizing Raspberry Pi Performance
To get the most out of your Raspberry Pi, consider the following optimizations:
Overclocking
Adjust the overclocking settings in the Raspberry Pi Configuration tool to boost performance. Be cautious, as excessive overclocking can lead to instability or hardware damage.
Use Swap Space
Configure swap space to extend your Raspberry Pi's memory capacity:
sudo dphys-swapfile setup
sudo dphys-swapfile swapon
This can improve performance for memory-intensive applications.
Conclusion and Next Steps
In this guide, we've covered how to use a Raspberry Pi behind a firewall on Windows 10, including hardware and software setup, firewall configuration, remote access, monitoring tools, and security best practices. By following these steps, you can effectively monitor and manage your Raspberry Pi while maintaining a secure network environment.
We encourage you to share your experience with this setup in the comments below. If you found this guide helpful, consider exploring other Raspberry Pi projects or tutorials on our website. Stay tuned for more content that will help you maximize the potential of your Raspberry Pi!

